Accu-Chek Aviva

CURRENTLY UNAVAILABLE

FAQ

For more information check out our frequently asked questions.

Use this guide to determine which test strips will work with your Accu-Chek device. Select your device from the list to navigate to the appropriate section.  

Table of contents:

  • Accu-Chek Guide Me
  • Accu-Chek Guide
  • Accu-Chek Guide Link
  • Accu-Chek Aviva
  • Accu-Chek Aviva Connect
  • Accu-Chek Aviva Expert
  • Accu-Chek Nano

Accu-Chek Guide Me, Accu-Chek Guide, and Accu-Chek Guide Link meters

The Guide System meters mentioned above use Accu-Chek Guide test strips.

Accu-Chek Aviva, Accu-Chek Aviva Connect, and Accu-Chek Aviva Expert meters

The Aviva System meters mentioned above use Accu-Chek Aviva Plus test strips.

Accu-Chek Nano meter

The Accu-Chek Nano meter uses Accu-Chek SmartView test strips.

Performing a control test lets you know the meter and test strips are working properly.

Reasons to perform a control test, but are not limited to:

  1. You open a new test strip box.
  2. Your test result does not match how you feel.
  3. The test strips were stored in extreme temperatures or high humidity.
  4. The test strip container was left open.

Table of contents:

  1. Accu-Chek Guide
  2. Accu-Chek Guide Link
  3. Accu-Chek Guide Me
  4. Accu-Chek Aviva
  5. Accu-Chek Nano

Accu-Chek Guide and Accu-Chek Guide Link meters:

  1. Check the Use By date on the test strip container and the control solution bottles.

a. Do not use test strips or controls past the Use By date. Controls expire three months from the date of opening.

  1. Remove the control bottle cap. Wipe the tip of the bottle and discard the first drop of the solution into a tissue.
  2. Insert the metallic end of the test strip into the meter. The meter turns on. Place the meter on a flat surface.
  3. Apply the control solution you want to test, using either Level 1 or Level 2 control solution.
  4. When you see “Apply drop” appear on the display, squeeze the bottle until a tiny drop forms at the tip of the bottle.
  5. Touch the drop to the yellow edge of the test strip.

a. Do not put the control solution on top of the test strip.

  1. “Analyzing” will appear when you have enough of the control solution in the test strip.
  2. The control result and the control bottle symbol appear.
  3. While the strip is in the meter, press the up or down arrows to select the control level you tested.
  4. Press OK.

a. “Within range” and “✓” appear if the control result is within range.

b. “Out of range” and an "X" appear if the control result is out of range.

  1. Wipe the tip of the bottle with a tissue and cap the bottle tightly.

You can confirm your control results are within range by referring to the Control level 1 and Control level 2 ranges printed on the test strip container.

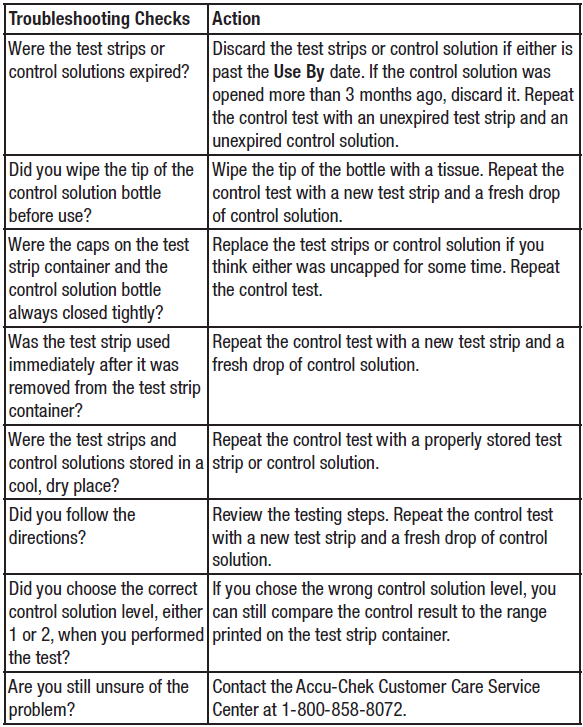
If the control results are “Out of Range,” reference the Troubleshooting Checks table below and repeat the control test.

Accu-Chek Guide Me meter:

  1. Check the Use By date on the test strip container and the control solution bottles.

a. Do not use test strips or controls past the Use By date. Controls expire three months from the date of opening.

  1. Remove the control bottle cap. Wipe the tip of the bottle and discard the first drop of the solution into a tissue.
  2. Insert the metallic end of the test strip into the meter. The meter turns on. Place the meter on a flat surface.
  3. Apply the control solution you want to test, using either Level 1 or Level 2 control solution.
  4. When you see the flashing blood drop appear on the display, squeeze the bottle until a tiny drop forms at the tip of the bottle.
  5. Touch the drop to the yellow edge of the test strip.

a. Do not put the control solution on top of the test strip. The flashing hourglass appears when you have enough solution in the test strip.

  1. The control result, the bottle symbol, and the flashing L1 or L2 appear on the display.
  2. Press the left or right arrow buttons to alternate between L1 and L2.
  3. Press and release the power button on the side once the correct L1 or L2 is displayed on the screen.

a. “OK” appears if the control result is within range.

b. “Err” appears if the control result is out of range.

  1. Wipe the tip of the bottle with a tissue and cap the bottle tightly.

You can also confirm your control results are within range by referring to the Control level 1 and Control level 2 ranges printed on the test strip container.

If the control results are “Out of Range,” reference the Troubleshooting Checks table below.

Accu-Chek Aviva Meter:

  1. Check the use by date on the test strip container. Do not use test strips past the use by date.
  2. Place the meter on a flat surface.
  3. Remove the cap from the control solution bottle and wipe the tip of the bottle with a lint-free wipe.
  4. Squeeze the bottle until a tiny drop forms at the tip.
  5. Touch the drop to the front edge of the yellow window of the test strip.
  6. Remove the bottle from the test strip when E appears. Do not put a drop on top of the test strip.
  7. Wipe the tip of the bottle with a lint-free wipe and cap the bottle tightly.
  8. The control result appears on the display. Remove and discard the used test strip per facility policy.

a. Note: If the control bottle symbol and the flashing “L” does not appear on the display with your control result, an error has occurred.

i. Do not act on the control result. Repeat the control test with a new test strip.

  1. You can compare the control result with the acceptable range printed on the test strip container label. If the control result is within the acceptable range, correct functioning of the system is assured.
  2. If the control result is outside the acceptable range or if an error message is displayed, reference the Troubleshooting Checks table below, and repeat the control test.
  3. If the second control result is also outside the acceptable range or an error message is displayed, contact Accu-Chek Customer Care.

Accu-Chek Nano Meter:

  1. To make sure the display is working properly, turn off the meter, then press and hold Power/Set Button located on the right side of the meter to see the complete display. All segments should be clear and complete. If any segments are missing from the display, there may be a problem with the meter.
  2. Check the Use By date on the test strip container. Do not use test strips past the Use By date
  3. Insert the test strip into the meter in the direction of the arrows.
  4. Place the meter on a flat surface, like a table.
  5. Remove the control bottle cap and wipe the tip of the bottle with a tissue.
  6. Squeeze the bottle until a tiny drop forms at the tip. Touch the drop to the front edge of the yellow window of the test strip. Do not put the control solution on top of the test strip. When you see the hourglass icon flash, you have enough control solution in the test strip. Wipe the tip of the bottle with a tissue, then cap the bottle tightly
  7. A result appears on the display along with the control bottle symbol.
  8. The control result and OK alternate on the display if the result is in range. The range is printed on the test strip
  9. container label. The control result and Err alternate on the display if the result is out of range. Remove and discard the used test strip. Check the Troubleshooting Checks table below to see what may be causing the problem and repeat the control test.
  10. If the second control result is also outside the acceptable range or an error message is displayed, contact Accu-Chek Customer Care.

control-troubleshooting.png

Your meter comes with the batteries already installed and a preset time and date. You may need to change the time to match your time zone, or if you live in a state that observes daylight saving time, to reflect the time change.

Table of contents:

  1. Accu-Chek Guide Meter
  2. Accu-Chek Guide Me Meter
  3. Accu-Chek Aviva Meter
  4. Accu-Chek Nano Meter

How to change the time and date on the Accu-Chek Guide meter

  1. Turn the meter on by briefly pressing “OK.” From the main menu, press the arrow key to highlight settings. Press “OK.”
  2. Time/date is highlighted. Press “OK.”
  3. Press the up or down arrows to adjust each field. Press “OK” to set and proceed to the next field. Set AM or PM if necessary.
  4. Press “OK” to save and return to the previous menu.

How to change the time and date on the Accu-Chek Guide Me meter

  1. Press and release the power button to turn the meter on. The flashing test strip symbol appears on the display.
  2. Press and hold the power button until set-up appears on the display. The hour flashes.
  3. Press the left and right arrow buttons to decrease or increase the hour.
  4. Press the power button to set the hour and move to the next field.
  5. Repeat steps 2 and 3 to set minutes, am or pm, month, day, and year. Press and hold the power button until the flashing test strip symbol appears to exit the set-up mode.

How to change the time and date on the Accu-Chek Guide Link meter

  1. Turn the meter on by briefly pressing “OK.” From the main menu, press the arrow key to highlight settings. Press “OK.”
  2. Time/date is highlighted. Press “OK.”
  3. Press the up or down arrows to adjust each field. Press “OK” to set and proceed to the next field. Set AM or PM if necessary.
  4. Press “OK” to save and return to the previous menu.

a. Note: Feature is only available if the meter is not paired with a pump. If paired with a pump, the meter time and date are automatically set to the pump’s time and date during communication.

How to change the time and date on the Accu-Chek Aviva meter

This video shows you how to set the time and data on the black Accu-Chek Aviva meter.

Setting the time and date on the black ACCU-CHEK Aviva meter

How to change the time and date on the Accu-Chek Nano meter

This video shows you how to set the time and date on the Accu-Chek Nano meter.

Setting Time & Date: ACCU-CHEK Nano Meter Video

This article contains information regarding Accu-Chek test reminders and how they function on your meter. Look for the name of your product to find the relevant information below.

Table of contents:

  1. Accu-Chek Guide Meter
  2. Accu-Chek Guide Link Meter
  3. Accu-Chek Aviva Meter
  4. Accu-Chek Aviva Expert Meter
  5. Accu-Chek Nano Meter

How do Accu-Chek Guide test reminders work? 

You can set up to 4 general test Reminders per day to remind you to test. A series of beeps sound and a bell is displayed for reminders set in the meter.

About Guide Me reminders:

  • Turn off by inserting a test strip or pressing any button
  • Are postponed until the next test reminder if a test was performed within 15 minutes of a test reminder
  • Do not appear/beep if the meter is on at the test reminder time (including when the meter is connected to a USB cable)
  • Do not appear/beep if the meter is connected and communicating to a Continua Certified® manager.
  • Do not beep if the meter beeper is set to off.
  • Do not appear/beep if the batteries need to be replaced

About pre-set reminders:

  1. Reminder times are pre-set in the meter for 8:00 am, 12:00 pm, 6:00 pm, and 10:00 pm. You may change reminder times by following the instructions below.
  2. If a general test Reminder is set for the same time as a Post Meal reminder, the Post Meal reminder will appear/beep instead of the general Reminder

Changing pre-set test reminder times:

  1. Turn the meter on by briefly pressing the “OK”
  2. Press down to highlight Settings. Press “OK"
  3. Press down to highlight More Options. Press “OK”
  4. Press down to highlight Reminders. Press “OK”
  5. Pre-set reminder times appear on the display. Press down to highlight the time you want to edit. Press “OK”
  6. Press down to highlight Edit time. Press “OK”
  7. Press up or down to adjust each field.
  8. Press “OK” to move to the next field.
  9. Press “OK” to return to the previous menu.

How do Accu-Chek Guide Link test reminders work? 

You can set up to 4 general test Reminders per day to remind you to test. A series of beeps sound and is displayed for reminders set in the meter.

About Guide Me reminders:

  • Turn off by inserting a test strip or pressing any button
  • Are postponed until the next test reminder if a test was performed within 15 minutes of a test reminder
  • Do not appear/beep if the meter is on at the test reminder time
  • Do not appear/beep if the meter is connected and communicating to the paired pump
  • Do not beep if the meter’s beeper is set to off
  • Do not appear/beep if the batteries need to be replaced

About pre-set reminders:

  1. Reminder times are pre-set in the meter for 8:00 am, 12:00 pm, 6:00 pm, and 10:00 pm
  2. If a general test reminder is set for the same time as a post meal reminder, the post meal reminder will appear/beep instead of the general reminder

How do Accu-Chek Aviva test reminders work? 

You can set up to 4 test reminders per day. At the set reminder time, the meter will beep every 2 minutes, up to 3 times per reminder.

About Aviva test reminders:

  • Turn off reminder beeps by going into setup mode and turning the beeper off.
  • Are postponed until the next test reminder if a test was performed within 30 minutes of a test reminder
  • Do not appear/beep if the meter is on at the test reminder time

About Aviva meal markers:

  • With the Accu-Chek Aviva black meter, marking results with a pre-meal or post-meal marker can provide more information about how food affects your blood sugar, to aid in managing your numbers.
  • You can also use a general marker to identify a non-fingertip test or post-exercise result. These markers can help you remember what was different about the result when you review your results in the meter’s memory.

How do Accu-Chek Aviva Expert test reminders work? 

You can set up to 8 alarm clock reminders per day for tests, injections or other events, as well as automatic reminders after high or low blood glucose results, or after certain meals.

About Aviva Expert test reminders:

  • You can also set reminders for appointments on specific days. At the scheduled time, the meter turns on and displays the reminder, along with a sound or vibration, if a test strip has not been inserted.
  • If the meter is already on and no blood glucose test has been performed, the reminder is displayed when the meter powers down. You can silence the test reminders by setting the meter to sound or vibrate mode within the meter settings.

How do Accu-Chek Nano test reminders Work ? 

Once set, test reminders will beep every 2 minutes up to 3 times.

About Nano test reminders:

  • The reminder will turn off when you insert a test strip or press any button.
  • To turn the beeper off all the way, refer to the set-up instructions in your Owner's Booklet.

Possible causes and solutions for sudden power loss include:

Issue: Solution:
The meter automatically turns off after 90 seconds of inactivity. Turn the device back on when you’re ready to use it again.
After completion of a test, the meter automatically turns off 15 seconds after strip removal. Turn the device back on when you’re ready to use it again.
The battery compartment or battery door is faulty or damaged. Please contact Accu-Chek Customer Care.
The meter has been stored in extremely cold conditions (below 30°F / - 1°C). Move to an area where the temperature is within the system's operating temperature range. Wait at least 15 minutes for the meter to equilibrate.
The meter is connected to a computer via the USB cable and a compatible software application is not installed on the computer. Disconnect the cable and attempt to turn the meter on by pressing and releasing the power button.
The meter is connected to a computer via the USB cable and a compatible software application has turned off the meter. Disconnect the cable and attempt to turn the meter on by pressing and releasing the power button.

Battery life on Accu-Chek products varies by device and by testing conditions. Find your device in the list below to determine what type of batteries your product uses:

Table of contents:

  • Accu-Chek Guide Me
  • Accu-Chek Guide
  • Accu-Chek Aviva Connect
  • Accu-Chek Nano
  • Accu-Chek Aviva
  • Accu-Chek Aviva Expert
  • Accu-Chek Compact Plus

Accu-Chek Guide Me, Accu-Chek Guide, Accu-Chek Aviva Connect, and Accu-Chek Nano meters

These meters use two 3-volt lithium coin cell batteries (type CR2032) found in many stores.

Accu-Chek Aviva meter

This meter uses one 3-volt lithium coin cell battery (type CR2032) found in many stores.

Accu-Chek Aviva Expert and Accu-Chek Compact Plus meters

These meters use two standard AAA batteries, preferably alkaline. Rechargeable batteries can also be used; however they normally provide slightly lower power.

Battery ingestion

Battery ingestion

If you suspect your child has swallowed a battery, seek medical attention immediately – prompt action is critical. Don’t wait for symptoms to develop.

Battery ingestion or insertion into the body may cause chemical burns, perforation of soft tissues, and death. Batteries, as small parts, are a choking hazard. Keep them away from children under the age of 3 years.

If the battery compartment does not close securely, stop using the product and keep it away from children. Contact Accu-Chek Customer Care.

This article contains instructions on how to replace your Accu-Chek meter batteries. Look for the name of your product to find the relevant instructions or videos below.

Please note that your data will not be lost when you remove the batteries from your meter.

Table of contents:

  1. Accu-Chek Guide Meter
  2. Accu-Chek Guide Me Meter
  3. Accu-Chek Guide Link meter
  4. Accu-Chek Aviva Meter
  5. Accu-Chek Aviva Connect Meter
  6. Accu-Chek Aviva Expert meter
  7. Accu-Chek Nano meter
  8. What to do in the case of suspected battery ingestion.

Accu-Chek Guide meter

  1. Open the child-resistant battery door by inserting a narrow object, such as a pen, into the slot.
  2. Push the tab in the direction of the arrow and lift the battery door up.
  3. Release the old batteries by pushing the release button.
  4. Press and hold the power/set/ok button on the front of the meter for at least 2 seconds. Wait 20 seconds.
  5. Slide the new batteries under the black tabs with the (+) side facing up.
  6. Put the battery door back in place and snap it closed. In addition, this video shows you how to change the batteries of the Accu-Chek Guide meter.

Accu-Chek Guide Meter: Changing the Batteries

Accu-Chek Guide Me meter

  1. Open the child-resistant battery door by inserting a narrow object, such as a pen, into the slot.
  2. Push the tab in the direction of the arrow and lift the battery door up.
  3. Remove the old batteries.
  4. Press and hold the power/set/ok button on the front of the meter for at least 2 seconds. Wait 20 seconds.
  5. Slide the new batteries under the black tabs with the (+) side facing up.
  6. Put the battery door back in place and snap it closed. In addition, this video shows you how to change the batteries of the Accu-Chek Guide Me meter.

Accu-Chek Guide Me - Changing Batteries

Accu-Chek Guide Link meter

  1. Open the battery door on the back of the meter by pushing the tab in the direction of the arrow and pulling the door up.
  2. Release the old batteries by pushing the release button.
  3. Remove the old batteries.
  4. Press and hold the power/set/ok button on the front of the meter for at least 2 seconds. Wait 20 seconds
  5. Slide the new batteries under the black tabs with the (+) side facing up.
  6. Put the battery door back in place and snap it closed.

Accu-Chek Aviva meter

  1. Open the battery door on the back of the meter, remove the old battery, press any button on the meter for 2 seconds, wait 20 seconds.
  2. Insert the new battery with the (+) facing outwards.
  3. Snap the battery door back into place.
  4. Press the on/off button and the meter will beep.
  5. The setup and hour should be flashing on the display. If the date and time are correct, press and hold the on/off button for at least 4 seconds until the test strip icon appears.

Accu-Chek Aviva Connect meter

  1. Use your thumb to slide the battery drawer out of the meter.
  2. Remove the old batteries.
  3. Replace the new ones in the battery drawer, with the (+) side facing down.
  4. Slide the battery drawer back into position until it locks into place.
  5. Accu-Chek Aviva Expert meter
  6. Remove the battery door from the back of the meter by pushing the tab in the direction of the arrow and pulling up the door.
  7. Remove the old batteries from the meter.
  8. Insert three AAA batteries with the (+) and (-) matching the marks in the battery compartment.
  9. Put the battery door back in place and snap it closed.

Accu-Chek Nano meter

  1. Open the battery drawer on the back of the meter by sliding it out of the meter.
  2. Remove the old batteries for at least 20 seconds.
  3. Press any button on the meter, then insert the new batteries with the (+) facing down.
  4. Slide the battery drawer back into position until it locks into place.
  5. Press the on/off button and the meter will beep. The setup and date should be flashing on display.
  6. Your meter will prompt you to confirm the meter’s time and date settings. If correct, press and hold the on/off button for 4 seconds, then release.

If you have persistent issues with your batteries or power, please contact Accu-Chek Customer Care for assistance.

Battery ingestion

Battery ingestion

If you suspect your child has swallowed a battery, seek medical attention immediately – prompt action is critical. Don’t wait for symptoms to develop.

Battery ingestion or insertion into the body may cause chemical burns, perforation of soft tissues, and death. Batteries, as small parts, are a choking hazard. Keep them away from children under the age of 3 years.

If the battery compartment does not close securely, stop using the product and keep it away from children. Contact Accu-Chek Customer Care.

There’s no need to manually code any of our meters. You can discover more detailed information below.

Accu-Chek Guide Me, Accu-Chek Guide, Accu-Chek Guide Link, Accu-Chek Aviva Connect, Accu-Chek Nano and Accu-Chek Compact Plus meters

There’s no need to code any of these meters, so you have fewer steps in testing.

Accu-Chek Aviva meter

The black Accu-Chek Aviva meter does not need to be coded. If you have a silver Accu-Chek Aviva meter, learn more about how to upgrade to a new Accu-Chek Guide Me meter by contacting Accu-Chek Customer Care

Accu-Chek Aviva Expert

These meters come precoded with a black code key that remains in place for the life of the meter. There's no need to manually code the meter.

If you do not have a black code key, please

contact Accu-Chek Customer Care.

Whatever type of Accu-Chek meter you have, cleaning and disinfecting are important for good maintenance.

While cleaning is simply removing dirt from the meter, disinfecting refers to removing as much of the disease-causing microorganisms and other germs as possible.

When to clean and disinfect your Accu-Chek Meter:

You should clean and disinfect your meter once a week, or any time blood gets on it. You should also clean your meter before allowing anyone else to handle it.

What to use when cleaning and disinfecting your Accu-Chek Meter:

Super Sani-Cloth® disposable pop-up wipes are a convenient way to kill germs, and have been approved for cleaning and disinfecting the meter. You can buy them online from Amazon.com, Office Depot, Walmart and other retailers.

The parts of your Accu-Chek meter you should keep clean:

Be sure to clean the areas around slots and openings, while being careful not to get any moisture in them.

You should also wipe down the entire meter surface, including the meter display.

For any airline travel, it’s important that you carry a letter certifying that your blood glucose meter is in compliance with airline regulations. You can download it below.

Always ensure that your meter is set up correctly for travel, such as by turning off Bluetooth and turning on flight mode. For more information, check out this article all about traveling with diabetes.

Download Accu-Chek air travel documentation:

Accu-Chek Guide Me (English)

​​Accu-Chek Guide (English)

Accu-Chek Aviva and Accu-Chek Nano (English)

Accu-Chek Aviva Connect (English)

Accu-Chek Aviva Expert (English)

Product Registration

Register your Accu-Chek Product

Register your Accu-Chek products so that we can share helpful updates and quickly provide assistance when you need it.

Register now

Get in touch

Chat

Available from 8AM–8PM(ET), Mon–Fri.

Start Chat

Email

To reach Accu-Chek Customer Care via email, send a message to [email protected] or complete this form. You can expect to receive a reply in 1-3 working days.

Send a message
Call

Blood glucose testing products:1-800-858-8072

Digital Products and/or Health Care Professionals: 1-800-628-3346

Online Purchases & Subscriptions: 1-800-816-4373

Insulin Pump/IDS: 1-800-688-4578