Accuracy
Table of contents:
- Accu-Chek Guide
- Accu-Chek Guide Link
- Accu-Chek Guide Me
- Accu-Chek Aviva
- Accu-Chek Nano
Accu-Chek Guide and Accu-Chek Guide Link meters:
- Check the Use By date on the test strip container and the control solution bottles.
a. Do not use test strips or controls past the Use By date. Controls expire three months from the date of opening.
- Remove the control bottle cap. Wipe the tip of the bottle and discard the first drop of the solution into a tissue.
- Insert the metallic end of the test strip into the meter. The meter turns on. Place the meter on a flat surface.
- Apply the control solution you want to test, using either Level 1 or Level 2 control solution.
- When you see “Apply drop” appear on the display, squeeze the bottle until a tiny drop forms at the tip of the bottle.
- Touch the drop to the yellow edge of the test strip.
a. Do not put the control solution on top of the test strip.
- “Analyzing” will appear when you have enough of the control solution in the test strip.
- The control result and the control bottle symbol appear.
- While the strip is in the meter, press the up or down arrows to select the control level you tested.
- Press OK.
a. “Within range” and “✓” appear if the control result is within range.
b. “Out of range” and an "X" appear if the control result is out of range.
- Wipe the tip of the bottle with a tissue and cap the bottle tightly.
You can confirm your control results are within range by referring to the Control level 1 and Control level 2 ranges printed on the test strip container.
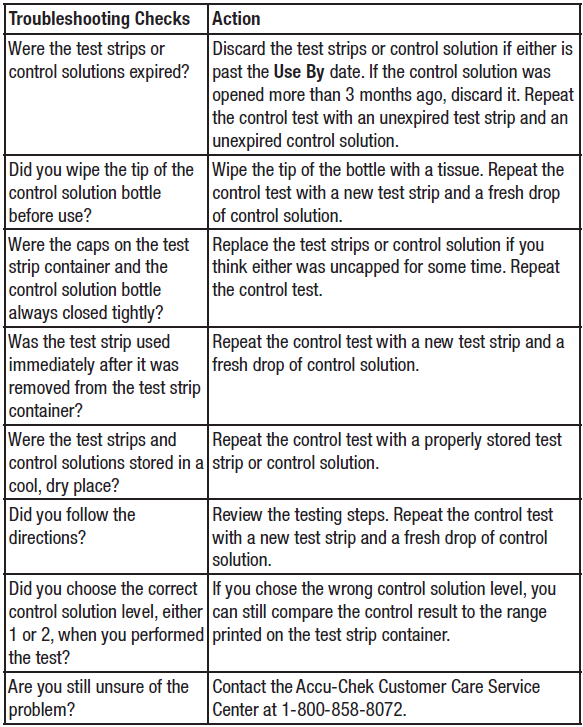
If the control results are “Out of Range,” reference the Troubleshooting Checks table below and repeat the control test.
Accu-Chek Guide Me meter:
- Check the Use By date on the test strip container and the control solution bottles.
a. Do not use test strips or controls past the Use By date. Controls expire three months from the date of opening.
- Remove the control bottle cap. Wipe the tip of the bottle and discard the first drop of the solution into a tissue.
- Insert the metallic end of the test strip into the meter. The meter turns on. Place the meter on a flat surface.
- Apply the control solution you want to test, using either Level 1 or Level 2 control solution.
- When you see the flashing blood drop appear on the display, squeeze the bottle until a tiny drop forms at the tip of the bottle.
- Touch the drop to the yellow edge of the test strip.
a. Do not put the control solution on top of the test strip. The flashing hourglass appears when you have enough solution in the test strip.
- The control result, the bottle symbol, and the flashing L1 or L2 appear on the display.
- Press the left or right arrow buttons to alternate between L1 and L2.
- Press and release the power button on the side once the correct L1 or L2 is displayed on the screen.
a. “OK” appears if the control result is within range.
b. “Err” appears if the control result is out of range.
- Wipe the tip of the bottle with a tissue and cap the bottle tightly.
You can also confirm your control results are within range by referring to the Control level 1 and Control level 2 ranges printed on the test strip container.
If the control results are “Out of Range,” reference the Troubleshooting Checks table below.
Accu-Chek Aviva Meter:
- Check the use by date on the test strip container. Do not use test strips past the use by date.
- Place the meter on a flat surface.
- Remove the cap from the control solution bottle and wipe the tip of the bottle with a lint-free wipe.
- Squeeze the bottle until a tiny drop forms at the tip.
- Touch the drop to the front edge of the yellow window of the test strip.
- Remove the bottle from the test strip when E appears. Do not put a drop on top of the test strip.
- Wipe the tip of the bottle with a lint-free wipe and cap the bottle tightly.
- The control result appears on the display. Remove and discard the used test strip per facility policy.
a. Note: If the control bottle symbol and the flashing “L” does not appear on the display with your control result, an error has occurred.
i. Do not act on the control result. Repeat the control test with a new test strip.
- You can compare the control result with the acceptable range printed on the test strip container label. If the control result is within the acceptable range, correct functioning of the system is assured.
- If the control result is outside the acceptable range or if an error message is displayed, reference the Troubleshooting Checks table below, and repeat the control test.
- If the second control result is also outside the acceptable range or an error message is displayed, contact Accu-Chek Customer Care.
Accu-Chek Nano Meter:
- To make sure the display is working properly, turn off the meter, then press and hold Power/Set Button located on the right side of the meter to see the complete display. All segments should be clear and complete. If any segments are missing from the display, there may be a problem with the meter.
- Check the Use By date on the test strip container. Do not use test strips past the Use By date
- Insert the test strip into the meter in the direction of the arrows.
- Place the meter on a flat surface, like a table.
- Remove the control bottle cap and wipe the tip of the bottle with a tissue.
- Squeeze the bottle until a tiny drop forms at the tip. Touch the drop to the front edge of the yellow window of the test strip. Do not put the control solution on top of the test strip. When you see the hourglass icon flash, you have enough control solution in the test strip. Wipe the tip of the bottle with a tissue, then cap the bottle tightly
- A result appears on the display along with the control bottle symbol.
- The control result and OK alternate on the display if the result is in range. The range is printed on the test strip
- container label. The control result and Err alternate on the display if the result is out of range. Remove and discard the used test strip. Check the Troubleshooting Checks table below to see what may be causing the problem and repeat the control test.
- If the second control result is also outside the acceptable range or an error message is displayed, contact Accu-Chek Customer Care.
Performing a control test lets you know the meter and test strips are working properly.
Reasons to perform a control test, but are not limited to:
- You open a new test strip box.
- Your test result does not match how you feel.
- The test strips were stored in extreme temperatures or high humidity.
- The test strip container was left open.
Other categories
Check other FAQ categories by clicking on the below category names.